 Save
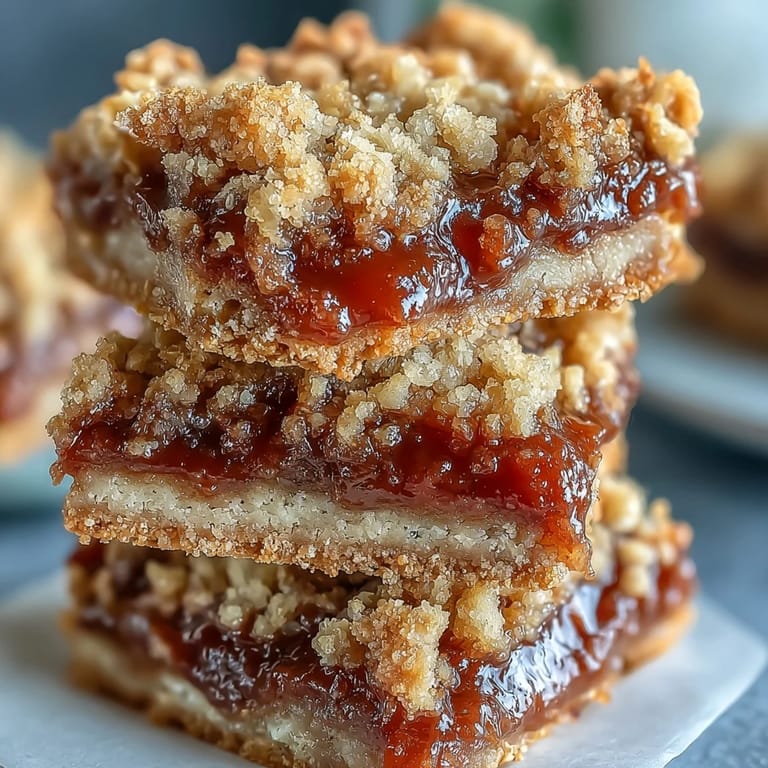
Save My neighbor Maria handed me a jar of homemade guava jam last summer, insisting I do something special with it. I stood in my kitchen that humid afternoon, staring at the deep pink preserve, when it hit me—why not layer it into something buttery and crumbly? These bars came together almost by accident, but once I pulled them from the oven and caught that first whiff of caramelized butter meeting tropical fruit, I knew I'd stumbled onto something good.
I brought these to a potluck where everyone expected the usual chocolate chip cookies, and watching faces light up when they bit into that tropical jam was honestly the best part of my week. My friend Derek asked for the recipe right then and there, which almost never happens—he's the type who claims cooking isn't his thing. Turns out all he needed was a recipe that doesn't pretend to be something it's not.
Ingredients
- All-purpose flour (2 cups): This is your structural backbone, giving the bars that tender-but-sturdy crumb that holds up beautifully when you bite into them.
- Granulated sugar (1 cup): It sweetens the dough and helps create those delicate, crispy edges that make you reach for another bar.
- Baking powder (1/2 teaspoon): Just a whisper of lift to keep the texture light and almost cookie-like rather than dense.
- Salt (1/4 teaspoon): Never skip this—it's the secret that makes the guava flavor sing instead of feeling flat.
- Unsalted butter, cold and cubed (1 cup): Cold butter is everything here; it creates those precious little pockets that make the crumb so tender and crumbly.
- Large egg (1): This brings everything together into a cohesive dough without making it wet or cake-like.
- Vanilla extract (1 teaspoon): A quiet backdrop that lets the guava be the star while adding warmth and depth.
- Guava jam or paste, softened (1 cup): This is your filling's moment to shine—choose one you'd actually eat by the spoonful straight from the jar.
Tired of Takeout? 🥡
Get 10 meals you can make faster than delivery arrives. Seriously.
One email. No spam. Unsubscribe anytime.
Instructions
- Set up your workspace:
- Preheat your oven to 350°F and line an 8x8-inch pan with parchment paper, letting the edges overhang so you can lift everything out later without wrestling with the pan. This is the move that prevents frustration when these are hot and you're eager to cut into them.
- Build your dry mixture:
- Whisk together the flour, sugar, baking powder, and salt in a large bowl—this distributes the leavening evenly so every bite has the same tender texture. It takes about thirty seconds and makes a real difference.
- Work in the butter:
- Add your cold, cubed butter and use a pastry cutter or your fingertips to break it into the flour until everything looks like coarse sand. You want to see little butter flecks throughout, not a smooth paste—those flecks turn into magic in the oven.
- Bring it together:
- Stir in the egg and vanilla until a crumbly dough just comes together; don't overmix or you'll lose that tender quality. It should look almost shaggy and loose, almost like it's not quite ready—that's exactly right.
- Create your base layer:
- Press about two-thirds of the dough firmly and evenly across the bottom of your prepared pan, using the bottom of a measuring cup to help compress it. Take your time here because a solid base keeps everything from getting soggy.
- Spread the guava treasure:
- Dollop your softened guava jam across the base and gently spread it into an even layer, leaving just a tiny border around the edges so it doesn't spill out during baking. A small spatula works better than a knife here.
- Top with the streusel:
- Break up the remaining dough and scatter it over the jam layer so it looks rustic and golden when baked. Don't press it down—let it sit loose so it gets crispy.
- Bake until golden:
- Slide into the oven for 35 to 40 minutes, watching for when the top turns that beautiful pale gold color. The edges might brown slightly faster than the center, and that's perfect.
- Cool completely:
- This is where patience matters—let them cool all the way down in the pan so the jam sets properly and everything holds together when you cut. Warm bars fall apart; cool bars stay elegant.
 Save
Save There's something deeply satisfying about a dessert that feels special but doesn't demand hours of your time or weird ingredients. These bars sit in that sweet spot where simple technique meets tropical flavors, and they've become the thing I make when I want to impress someone without letting them know I barely tried.
Why These Bars Beat Regular Cookies
Cookie bars live in a magical middle ground—they have the texture and buttery richness of a shortbread, but with the ease of sheet pan baking. You don't have to scoop and space them out, you don't have to watch for spreading, and you don't have to worry about every single one turning out the same. Just press, spread, crumble, and bake. The guava jam turning slightly jammy at the edges while the cookie parts crisp up? That's where the real flavor happens.
Choosing Your Jam and Making Swaps
Guava is special, but honestly any jam you love will work here—I've made these with apricot when guava wasn't on hand, and with raspberry when I was feeling less tropical. The key is choosing something with real flavor that you'd actually want to eat, not something that's mostly sugar and artificial color. If you find yourself with thick jam that's hard to spread, let it sit on the counter for ten minutes or give it a gentle warmth. For a texture twist, stir toasted chopped nuts (pecans, almonds, or even macadamia) into that streusel layer before sprinkling it over the jam.
Storage, Serving, and Joy
These keep beautifully in an airtight container for up to four days, though honestly they rarely last that long in my house. They're perfect at room temperature with coffee, or even better with a scoop of vanilla ice cream when you want to turn an afternoon snack into a moment of actual indulgence. Cut them into squares, wrap a few in parchment paper, and suddenly you have a gift that feels handmade and thoughtful.
- Let them cool completely before cutting so the jam sets and the bars hold their shape.
- A sharp knife dipped in hot water and wiped clean between cuts gives you neat edges.
- If you're gifting them, they travel well in a flat container lined with parchment paper.
 Save
Save Making these bars has become my shorthand for 'I'm thinking of you' because they feel personal without being fussy. Pair them with good coffee or vanilla ice cream, and you've got something memorable.
Recipe FAQs
- → Can I use fresh guava instead of jam?
Fresh guava doesn't work well here since you need a thick, spreadable consistency. Use guava paste (heat it slightly to soften) or store-bought guava jam. If using paste, you may need to add a tablespoon of water to make it spreadable.
- → Why is my dough too dry or crumbly?
The dough should feel like coarse crumbs that hold together when squeezed. If it's too dry, your butter may have been too warm or measured incorrectly. Try adding 1-2 teaspoons of cold water and mixing gently until it just comes together.
- → How do I know when the bars are done?
The streusel topping should be lightly golden, not brown or pale. The jam layer may bubble slightly around the edges. The center should feel set when gently touched. If the top browns too quickly, tent with foil for the last 10 minutes.
- → Can I make these ahead of time?
Absolutely. The bars keep well at room temperature for up to 3 days in an airtight container, or refrigerate for up to a week. You can also freeze the baked bars for up to 3 months—thaw overnight at room temperature before serving.
- → What other fruit fillings work?
Any thick jam or preserve works beautifully. Apricot, raspberry, mango, pineapple, or passion fruit are excellent choices. Avoid runny jams or fruit pie fillings as they'll make the bars soggy.
- → Do I need to refrigerate the dough?
No chilling is required—the dough can be pressed directly into the pan. However, if your kitchen is very warm or the butter softens while working, refrigerate the pressed base for 15 minutes before adding the jam and topping.